Lessons from our build
How to build a quieter home before the drywall goes up
A neighbor asked what we did during our build to make the house quieter. It is a good question to ask before framing, not after moving in. Many of the useful details disappear behind drywall. Here is what we chose, what else is worth considering, and what to ask your builder.
On this page15 sections
What we did in our house
We used 1-1/8-inch subfloor instead of the roughly 3/4-inch option. We also chose 1-3/4-inch solid interior doors and epoxy-coated cast iron drain pipes. We sealed sill-plate connections inside and outside, with ZIP System liquid flashing and acoustical caulk among the products used in our sealing work.
Those are our project choices, not a tested sound rating or a shopping list that every house needs. I would put quiet rooms on the design brief early. It is much easier to discuss a wall or drain route while it is still a line on a drawing.
- Ask explicitly for insulation in selected interior walls and between floors. Do not assume it is included in the standard package.
- Discuss 2x6 or 2x8 walls, staggered studs and floor depth with the designer before framing is ordered.
- Keep major drain stacks away from living and sleeping areas wherever the layout allows.
- Agree who seals joints and electrical boxes before the walls are closed.
Start with the noise you actually want to stop
Make a short list of situations that would bother you. A baby sleeping beside a TV room is different from footsteps above a bedroom or a toilet flushing behind the headboard. Mark the source and the quiet room on the floor plan.
Airborne sound includes voices and television. Impact sound includes footsteps and dropped objects. Plumbing and equipment can transmit both. STC describes airborne sound isolation. IIC describes impact isolation through a floor and ceiling. Neither number is a promise that you will hear nothing.
| What you hear | What to discuss |
|---|---|
| Voices through a bedroom wall | Wall assembly, insulation, door and sealed openings. |
| Footsteps from upstairs | Finished flooring, underlayment and the ceiling below. Not just thicker subfloor. |
| A flushing toilet or rushing water | Drain routing, pipe material, supports and the surrounding enclosure. |
| Noise around a closed office door | Door construction, perimeter seals and a suitable return-air path. |
| Traffic from outside | The full exterior wall, windows, doors and ventilation openings. Interior insulation alone is not the answer. |
Specify interior insulation. Do not assume it is standard
An insulated exterior does not tell you what is inside the bedroom partitions or between two heated floors. These areas may be left empty unless the drawings and contract say otherwise. Ask the builder to identify the exact walls and ceilings that will receive sound insulation.
Mineral-wool or fiberglass batts can absorb sound inside a cavity. They are one part of the assembly, not a replacement for drywall, sealing or separation between the two faces. Select the product and thickness for the specified assembly. Fit it around services without leaving gaps or stuffing an oversized batt into the space.
- Start with bedrooms, bathrooms, laundry rooms and the home office.
- Look at what sits above each quiet room, not only what is next door.
- Put the product, thickness and coverage locations in the bid. 'Insulation included' is not enough.
- Have the builder confirm the specified insulation works with any required fire-rated assembly.
ROCKWOOL: interior wall and floor insulation ↗ · Compare builder bids line by line →
Thicker walls create space. Separated framing does more
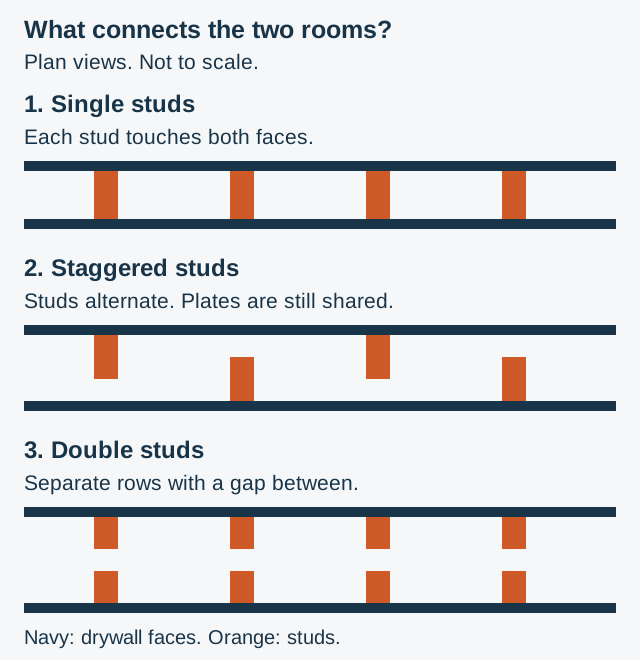
A 2x6 or 2x8 wall gives you a deeper cavity for insulation and services. But if both drywall faces attach to the same studs, those studs still connect the rooms. Do not assume a deeper wall automatically buys a large improvement.
Staggered studs alternate between the two faces on wider shared plates. This reduces direct connections through the studs. Double-stud walls use separate rows of framing and can provide greater separation when correctly detailed. Staggered framing is a useful option, not always the best possible system.
Ask your architect to select a tested wall assembly. Its gypsum layers, stud layout, insulation and connections all matter. A sound rating belongs to that complete assembly, not to a batt or stud size by itself.
- Ask for an alternate price at the most important room boundary before upgrading every wall.
- Confirm the extra wall thickness fits the floor plan, door jambs and cabinets.
- Have the designer resolve load-bearing, bracing and fire details. Do not simply remove blocking or connections to reduce sound.
Price 5/8-inch Type X drywall and a second layer where quiet matters
Ask for a price to use 5/8-inch Type X drywall instead of standard 1/2-inch board where the specified assembly allows it. It is a straightforward upgrade to consider before walls are finished. The added mass can help reduce airborne sound transmission. Type X describes fire-resistant board, not a soundproofing rating.
For bedrooms, an office or a media room, also price two layers of drywall on the relevant walls or ceiling. You do not have to upgrade every room. Additional layers can improve isolation as part of a suitable assembly, but they do not fix gaps, shared framing or noise traveling through doors and ducts.
Have the designer specify the panel product, layers, joint layout, sealing and fasteners. Check the added weight, ceiling support, electrical-box depth and door trim. Ask for the installed price difference, including labor and detailing. These can be sensible upgrades, but a second layer is not automatically cheap on every project.
USG: Type X drywall ↗ · USG: tested single- and double-layer assemblies ↗
Use thicker subfloor for a reason, not as a soundproofing promise
Our choice was 1-1/8-inch subfloor. I would ask the builder and engineer to compare that with the specified thinner panel before ordering. Discuss floor stiffness, span, panel grade, weight, cost and the finished floor height together.
Thicker subfloor is not a substitute for an impact-control floor assembly. A stiff floor can still transmit footsteps. If the concern is a bedroom below a hard-surface floor, ask for a tested floor-and-ceiling detail with the actual finish included.
Installation also matters. APA identifies panel spacing, adhesive selection and proper fastening as part of preventing squeaks. Specify the approved panel and attachment schedule. Walk the floor with the builder before finishes cover it and flag movement or squeaks then.
APA: building a squeak-free floor ↗ · Weyerhaeuser: floor sound performance ↗
Coordinate floor depth, insulation and the ceiling below
Deeper floor trusses can provide more room for insulation and services. That makes depth worth discussing early. It does not mean filling a deeper cavity will automatically stop footfall noise. Ask the engineer and truss supplier to coordinate the whole floor rather than increasing depth solely for sound.
For better isolation, discuss a tested ceiling detail using resilient channels or isolation clips. These reduce the direct connection between drywall and framing. Incorrect fasteners or added rigid connections can defeat that detail.
Floor depth also affects stairs, ceiling heights and the overall building section. Price the floor finish, underlayment, framing, insulation and ceiling together. Ask who checks the acoustic installation before it is concealed.
USG: sound paths and complete assemblies ↗ · Structural design choices that affect budget →
Seal the small gaps, using the right product for each job
Our build included sealing at sill-plate connections on the inside and outside. The sill plate is the timber at the foundation connection. Interior partition bottom plates and drywall edges are separate joints worth putting on the sealing checklist.
ZIP System liquid flashing is a building-envelope flashing product. Acoustical caulk serves a different purpose at sound-control joints. Do not treat them as interchangeable. Ask the builder to show which product is specified at each joint and follow the manufacturer's substrate and application instructions.
Acoustical sealant helps close leakage paths at assembly perimeters and other specified openings. Sealing the exterior connection alone does not finish the interior sound-control work. Include the drywall contractor in the discussion, not only the framing crew.
- Ask who seals the foundation connection, partition perimeters and service penetrations.
- Do not block drainage or ventilation openings that are meant to remain open.
- Where firestopping is required, use the specified listed system. A tube labeled acoustical caulk is not automatically suitable for every fire-rated penetration.
ZIP System: liquid flashing and installation instructions ↗ · USG: acoustical sealant applications ↗
Do not forget outlets, switches and other holes
Every electrical box is an interruption in the wall. For the walls where privacy matters, ask the electrician to avoid back-to-back boxes where practical and specify the appropriate acoustic treatment.
Putty pads can wrap the outside of electrical boxes. Use a product and detail approved for the actual box and assembly. Ask for compatible acoustic sealing at the box-to-drywall gap where specified. Do not pack ordinary caulk inside boxes or around live connections.
Have the electrician and drywall crew agree on sequencing before installation. Putty pads should not become an item everyone assumed someone else would handle. Photograph the treated boxes before they disappear.
- Check outlets and switches on both sides of each designated quiet wall.
- Include recessed lights, speakers, access panels and other openings in the review.
- Do not assume a pad's advertised sound rating is an improvement you can add to your wall's rating.
Choose solid doors, then deal with the gaps
We used 1-3/4-inch solid interior doors. They feel more substantial than lightweight hollow-core doors. Solid-core construction is a sensible option to discuss for bedrooms, offices and bathrooms, but thickness alone does not establish a sound rating.
Ask the door supplier about the whole opening: door, frame, perimeter seals and an automatic drop seal where appropriate. A good wall does not help much if sound has an easy route around its door.
Coordinate this with the heating and ventilation designer. Some rooms rely on a door undercut as part of the return-air path. Do not close that gap without providing an appropriate alternative. Ask for an air-return design that also respects the room's need for privacy.
Masonite: solid-core interior doors ↗ · Pemko: acoustic door seals ↗ · Building America: bedroom return-air paths ↗
Plan quieter plumbing before the stacks are installed
Try not to put the main vertical drain stack behind a bed, beside the sofa or in the wall of a quiet office. Ask the plumber to mark both vertical stacks and horizontal drain runs on the plans. A bathroom upstairs can affect a room that looks unrelated on the floor plan.
We chose epoxy-coated cast iron drain pipes. Cast iron's mass and material properties help control drainage noise. The epoxy coating is primarily a corrosion-protection feature, not the reason the pipe is quieter. Ask the plumber which pipe system makes sense for your project.
Routing, supports, couplings and the enclosure still matter. Ask how the system avoids unwanted contact with framing or drywall while remaining properly supported. Discuss insulating the enclosure and access for future maintenance. Cast iron is heavier and can cost more to install, so have it priced before the plumbing bid is finalized.
Charlotte Pipe: cast iron and plumbing noise ↗ · Charlotte Pipe: what epoxy coating is for ↗
Protect the quiet rooms from the rest of the house
Do a room-by-room walk through the drawings with your architect. Ask what happens when one person is sleeping and someone else is cooking, working or watching TV. Consider a closet, hallway or different room arrangement before trying to solve everything with materials.
Sound can travel around a carefully built wall through shared floors, ceilings and service routes. That is called flanking. Ask the design team to review the connections around a critical room, not just its main partition.
Also ask the mechanical contractor about equipment locations, duct paths and vibration control. Do not enclose equipment or alter its supports without the required clearances and approved details. For a music room, theater or unusually demanding privacy goal, involve an acoustical consultant before design is complete.
USG: sound paths and complete assemblies ↗ · Tell your architect how you live →
What I would prioritize with a limited budget
This is my suggested order for a homeowner conversation, not a universal cost ranking. Ask for separate prices so you can decide which rooms justify the upgrade.
- First, avoid placing noisy plumbing and equipment next to the spaces that need quiet.
- Next, specify interior insulation, proper floor installation and complete sealing. Make the scope visible in the contract.
- Then, improve the doors and the floor assembly around the bedrooms and office.
- For the most sensitive boundary, compare a tested staggered-stud, double-stud or isolated lining option.
- Do not spend the entire budget on thicker studs while leaving the door, ducts and openings unresolved.
Take this checklist to the pre-drywall walkthrough
Schedule this before insulation and drywall hide the work. Some items need an earlier check during rough-in. Have the builder arrange safe site access and the right trades. Photos are useful records, but they do not replace inspections or professional review.
| Check | What to confirm |
|---|---|
| Walls and floors | The agreed sound-control locations and assemblies match the drawings. |
| Subfloor | Correct panel and fastening details. Investigate squeaks or movement. |
| Insulation | Interior partitions and floor cavities are included where specified. No missed areas around services. |
| Separated framing | The framing and connections match the selected detail. No unapproved rigid bridges. |
| Electrical boxes | Required pads and perimeter treatment are assigned and installed at the correct stage. |
| Plumbing | Stack routes, pipe material, supports and enclosure details match the agreed scope. |
| Drywall | Panel thickness and any second layers are specified for each selected wall and ceiling. Confirm fastening, sealing and added-weight requirements. |
| Sealing | Plate connections, drywall perimeters and penetrations have a named responsible trade. |
| Doors and ventilation | Door construction, seals and return-air paths are coordinated before ordering. |
| Handover | Keep assembly details, product records and photos. List unresolved items before closing the walls. |
Please identify the walls, floors and rooms included in our sound-control scope. Show the specified assemblies, insulation, sealing, electrical-box treatment, doors and drain routing. Please list exclusions and price the upgrades separately. Let us review the concealed work together before drywall.
Common questions
Should I use 2x6 or 2x8 framing just to reduce noise?
Not without comparing complete wall options. Deeper framing provides more cavity space, but shared studs still connect both faces. Ask your designer whether separating the faces is a better use of the budget at that location.
Will thicker subfloor stop upstairs footsteps?
Not by itself. We chose 1-1/8-inch subfloor, but impact noise also depends on the flooring and the ceiling below. Ask for a complete floor assembly rather than a promised result from panel thickness.
Is insulation between interior rooms automatically included?
Do not assume so. Ask the builder to mark the included walls and floors and specify the product and installation. Exterior energy insulation and interior sound insulation are different scopes.
Do I need epoxy-coated cast iron to get quieter plumbing?
Cast iron provides the sound-control benefit. Epoxy coating addresses corrosion protection. It was our choice, but ask your plumber whether the additional coating is appropriate for your installation.
Can these details make a house completely soundproof?
No single upgrade guarantees silence. Set realistic expectations for each room and have the design team coordinate the whole assembly. High privacy needs deserve project-specific acoustic advice.
Written and sources reviewed . Wilson's project choices are homeowner experience, not laboratory results. Technical context comes from the linked manufacturer and Building America resources. This guide does not specify a fire-rated or structurally engineered assembly. Have your project team select and detail those systems.